Saturday 3 October 2009

Hux has got the Horn

I've noticed that the horn on my FZ6 is, how shall we put this diplomatically..... shite. This came to the fore when riding along a dual carriageway when a car joined from the slip road on my left so I moved over into the fast lane as it looked like he was coming straight out in to me. He did that, but also swung straight from the slip road straight into the fast lane in front of me as he wanted to overtake a car somewhere in the distance I guess. I hit the brakes and laid on the horn and a sound a bit like a gnat farting came out which he completly ignored :(

To remedy this I invested in a Stebel Nautilus Compact air horn which raises the sound level of the horn from the original aforesaid gnat fart to 139 dB. Ouch!

Those friendly chaps at eBay provided one of these for £20 and another tenner got me all the wiring kit (well I could have bought a bag of 100 spade connectors, but I only needed 6).

This morning saw the installation of this little puppy, after some dedicated reading on the FZ6 forum to see how they did it. The inside left fairing appeared to be the favourite option, so I set to work on that. The immediate issue is that there are no mounting screws in a sensible place that allow the horn to be secured. However, have cordeless drill, will travel, resulted in the below.


You can see where i drilled a small hole in the fairing, the ouside of which is covered by anothe bit of fairing, and the inside of which is hidden by the inner fairing. Move along now, nothing to see here :)

The horn itself then nestles in the side there, and a cable tie is there for emergencies while I run it in in case it works loose.


With the fairing back in place you can only just make out the logo sticking out the bottom.


And looking up from the front wheel you can see the pisspoor original (now disconnected) and the new HORN.


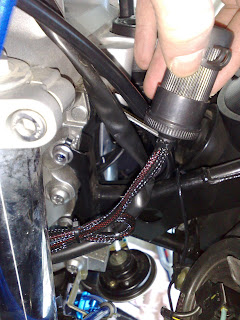
Disconnecting the original horn leaves two wires with spade connectors on the ends, one being ground, and one being the horn control signal. Luckily the relay that powers the new horn needs two signal, one being ground and the other being the horn control. And by feeding the wires back into the frame on the left hand side they just reach the relay which nestles in front of the battery. So that's one easy bit of the wiring done. The more complex part is getting a 12V from the battery, via a fuse, to the input of the relay, and from the output of there to the horn. While I was routing that I decided to route the horn ground back the same way to the battery ground rather than the frame. The wires all get sheathed in nylon ... errr.. sheathing (you can see it coming through the plastic clip behind the horn in the first picture on here so it almost looks professional).

When I work out how to get video on here I'll take a clip of it. But it's loud... damn loud!!!!!!!

Lets see the motorists ignore the horn now :)

Edit:-
Thinking about how the horn was perched on a screw through the plastic I decided to make something a bit more robust. When I say "make" I of course mean standing in the bracket aisle of B&Q trying to work out what I could cannabalise to do the job. It turned out that two right angle brackets coming to a wallet friendly total of £1.90 were just the job. One goes on the inside of the frame to go vertically up and then over the top of the horn. The horn then securily bolts onto to like this.


To provide support for this, I hacksawed the other bracket to produce a flat plate to go on the outside of the fairing. This is small enough to be covered by the outer-outer fairing, but large enough to spread the load across an area of the plastic instead of a small point where the bolt goes through. Like this.


Everything fitted back together with a bit of fairing jiggling so I'll see how it is on my road test tomorrow in to work.

Sunday 30 August 2009

Pick a place with a silly name. Ride there. Why not?

The bike was down to the reserve as I pulled into the garage after work on Friday night, and with a bit of fine weather this morning a fill up, collecting the sunday papers at the same time, and then a mornings ride seemed like the right thing to do.

I fancied a bit of speedy riding on good roads, then some twisties, so had a look at the map and found a place with a suitably sniggerable name (Helions Bumpstead) that I could work into such a route.


View
test in a larger map

The first bit leaves from Morissons petrol station and heads at legal speeds, honest officer, along the lovely new A428, devoid of all traffic and with no speed cameras on it :). This helps warm up the bike and the tires, and blow the cobwebs out of my head. After a stretch on the A14 which gets a bit busier around Cambridge, I hopped onto the Bottisham road, which runs parallel with the A14 but is empty and has some nice sweeping bends on it as well as some long straights. From there it's doubling back slightly onto another long straight road through Six Mile Bottom (snigger) and onto the A11 for a couple of junctions which allows for "progress to be made".

Left turn towards Linton takes me onto another road with nice sweeping bends, and bits of dual carraigeway to get past the slow lorries. This goes all the way to Haverhill, avoiding it, which is always a good thing :p.

With hindsight I should have turned right towards Steeple Bumpstead one junction later allowing for three snigger-worthy names en-route but turned to Helions Bumpstead instead. This was a twisty windy road with bits missing out of it and evidence of horses (or someone randomly carrying buckets of horse-muck and dumping it on the road) so gently does it all the way.

Then a right turn to Castle Camps and a nice ride through the countryside to Bartlow, and back onto the Linton road. By this time the munchies were setting in so I took the fast route home down the A505 and M11, again making good progress.

A celebratory pork pie called to me from the fridge once the bike was safely put to bed in the garage, so I attended to the aforesaid pie immediately.

In total that's 80 miles so approx half the tank of petrol I just put in it this morning.

Monday 17 August 2009

Off to see Inspector Morse

In preparation for the epic France fest planned much further down this blog, I've taken this week off to get some miles in on the bike on longer trips, and also play with loading it up with luggage, riding with extra weight on the back.

Today's ride out started at the crack of just after 8am with my light luggage pack of backpack with cereal bars, extra t-shirts in case it got cold, paper map and garmin GPS in case I got lost. My target for the day was Oxford which is about 80 miles away and all was well until I hit Bedford where the roadworks started and it was 30 mph for about 10 miles which slowed me down somewhat. Bah Humbug.

Eventually I made it to Milton Keynes where they appear to have no signs on any of the roundabout exits. I guess if there were any everyone in Milton Keynes would leave ;-). A quick stop in a Walmarts car park and my GPS was fitted and ready to get me out of there. In no time I was whizzing through Buckingham, speeding down the M40 which my GPS thought would be fun for a single junction, and somehow into the centre of Oxford itself. More by luck than judgement I found myself riding along that wide street that Morse/Lewis always drive down. Following random signs for parking, I found myself at a car park just next to the bus station and after parting with all my change (£2.30) I had an hour to wander around and stretch my legs.

Obligatory picture of an old college-y thing (All Souls apparently)


Another old building that appears quite a lot in Morse (outside all souls)


After my legs had a good stretch, and my bladder had a wee break, I jumped back on the bike again and plotted a route to Bicester, then across to Aylesbury, then home which would avoid Milton Keynes and also the roadworks that plagued me on the way down.

The GPS got me to Bicester easily but I hadn't plotted the next point and missed the turning for Aylesbury so after pootling around lost for a while admitted defeat, pulled over, and used the GPS. This took me back to Bicester for the second time along roads now looking somewhat familiar and then off to Aylesbury where I got lost once more and the GPS battery went flat.

Luckily, I'd planned for this and out came the cigarette adaptor for the GPS.


You can see the mobile phone holder that came clipped onto my tesco value backpack cunningly recycled to hold all the spare cable letting out just enough to reach the cigarette lighter socket on one side and the GPS on the other. It has Velcro on the back so even clamps on the bars.

However, and this is the one thing you don't notice till you ride with the charger in place, the observant will note the bars are cranked right over to the left. The speedo is easily visible. You can see what's coming next can't you? I didn't.


Yep. The charger completely blocks the line of site to the speedo so you only know how fast you're going on tight left hand bends. D'oh. Well that's my excuse... officer.

A bit more route entering and got me over to Luton to pick up the A6 which you could go too fast on quite easily if the GPS didn't keep flashing red "mobile speed camera location" warnings, which is probably a good thing. Right turn at Bedford saw me on the road for home, and just in time as my arse was starting to complain after so long on the bike.

As I pulled into the garage the trip meter was a couple of miles under 200 which is not bad for a days riding (and the longest I've done so far).

So lessons learned from the first long trip.

2 hours is pretty much as long as you want to sit in the saddle.
Your right wrist aches a lot when you're "making progress" all day.
A cereal bar in the pocket to nibble on is a handy thing to have so you can eat something while you try and work out where the hell you are.
GPS. A good thing. It just is.
Make sure the mods on your bike actually work and don't obstruct anything important, like your speedo.
Plan your route before you set off. It would make things much easier.

Tomorrow... well let's see what the weather brings :)

Thursday 9 July 2009

Hunstanton by the sea.

A cracking day forecast for Saturday so we left sunny Cambridge at the crack of 10am (no sense rushing up of a weekend is there) and headed off for the seaside. The route is straight up the A10 to Kings Lynn, and then the A149 to Hunstanton itself. Dave and Grandad took off at a fair old rate of knots, boy racers that they are, and were soon nowhere to be seen. I followed with Paul and BikerBabe Joan riding pillion trying to catch them up but it was a vain attempt.

The A10 has some nice straight bits and some curvy bits so nice variety (apart from the appalling surfacing in a couple of spots which almost jars you out of the seat just after Littleport). After being stuck behind some traffic I decided it was time to {cough} make progress {cough} and coming off a roundabout I popped it in 3rd gear and floored it past the cars in front. Looking down at the speedo I then realised that my previous "ton up" excursion was in a gear higher than it needed to be :o.

We made good time to Hunstanton and parked in the reserved bike park which is right on the sea front. Only a quid per bike and if we were any closer to the sea our tyres would be wet.


And..... relax. Dave, Grandad Frank, Paul (looking the wrong way) and BikerBabe Joan letting it all hang out.


Dave, Bikerhux, Joan, and Paul (right way round this time).


Do-it-dave replete with pristine knee sliders and his Bandit.


BikerHux and his FZ6


Bike Porn showing how close to the sea you are. Bikes all along this stretch!

After catching our breath we had the obligatory fish n chip supper while topping up our tans. The chippy is under that building you can see behind the bikes and well recommended. The more adventurous amongst us went for a plodge in the sea, while I took it easy watching the world go by (and a few people whose sunburn would hurt in the morning).

A quick loo break to cut down on excess weight on the journey back, and we scooted off the way we'd come down the A10 to Cambridge. Do-it-dave's throttle appeared to be stuck open as he took off at warp factor 10 while the rest of us took things at a more sedate pace.

A grand day out and has whetted our appetite for weekend rides and food cooked in lard.

As a bonus, when I filled my bike up this week I calculated the mileage and was pleasantly surprised. Normally I get 40-45 mpg, but with this ride out, where progress was most definitely made, oh yes, I got 55 mpg. So the next time you get pulled by the filth for speeding, just say you have to go fast to save the planet ;-)

Wednesday 24 June 2009

MCN article

page 1


page 2


page 3


page 4

Saturday 16 May 2009

Screens 1 - Engines 0.

After fitting the new double bubble screen I rode it in to work on Tuesday and the wind now pops either over my helmet when I'm tucked down, or onto the helmet if I'm not (which isn't as annoying as it sounds). Vast improvement on the stock screen so money well spent.. and it looks pretty sharp into the bargain :)

Leaving work in the evening however I got as far as the first right turn (stationary at lights) and noticed no indicators on the dashboard or the lights themselves. I cancelled them, reapplied, tried left and right but nothing. With a straight road all the way home I figured I could just ride it home not overtaking anything and fix it there. I made the turn, got on to the slip road to join the main road, got it up to about 70mph to join the traffic, and the engine cut out, all the lights on the dash went out, and I had engine braking to get me into traffic. Luckily my bowels held out and a hand signal got me into the margin of the slip road safely out of the traffic. After checking side stand (down-up-down-up... yes it's definitely up), engine cutoff (yep.. not that), I looked at the ignition key which was in the OFF position. All I can guess is that if you turn the key to ON (but it's not quite locked in place) it can move back to OFF, in this case at the worst place it could have.

Once I'd calmed down and managed to stop saying a word that rhymes with duck, I turned the key to the much better position of ON, fired up at the first attempt, and spanked the arse off the bike to get up to speed on the remaining 100 yards of the slip road before joining the main drag.

One to watch out for in future, but at least no harm came of it this time, other than to people with delicate sensibilities who may have been within earshot of me at the time.

Monday 11 May 2009

Double Bubble action

I've been noticing that on the way to work, as I'm "making progress" the wind tends to hit me in the Adams apple which is annoying to say the least. To remedy this, and also pimp my ride a little more, I purchased a Puig Double Bubble screen from those lovely people at eBay. This is slightly taller than the stock screen so should divert the breeze over the top of my head if all goes to plan.

The stock screen looks like this.


It's a screen and.. well.. that's all there is to it.

The new screen looks like this.


You can see it is a little taller than the stock one, with the bubble in the middle (of double bubble fame). It's also got a Puig and FZ6 logo on the front... which is nice :)

This is it in place.


The changing is simple as the screen is only held on by two screws under each of the rubber boots on the wing mirror stalks, and one under the lights where the screen curves under. The only tricky part is the edging which is a plastic beading that you need to feed onto the edge of the screen. Swapping screens was 5 mins and the next 20 mins was fitting the beading, then taking it off to adjust it. If you're doing this then feed the first edge down far enough so it disappears under the rubber boot as that seems to look neatest. The excess is then trimmed with scissors.

Tomorrow should see this taking for its maiden voyage to work to see if it was money well spent, or just vanity on my part :p

Sunday 10 May 2009

You can never have too much lubrication

After reading a couple of articles on the FZ6 forum I invested in a cable lubrication do-hickey (to give it it's technical name) courtesy of those lovely people at eBay. Sunday morning was bright and sunny so I decided to do a before and after run to see if there really was any effect.

A quick trip the the local shop for sunday paper and a tank full of petrol gave me the reference point before I started to fettle with anything. Next was the tricky bit of getting the end of the clutch cable out along with the sheathing. Luckily I'd invested in a Haynes manual which explains how to do this and after a quick look at the pictures I set to on it.

First step was to take a picture of the cable adjuster before I did anything so I could put the cable back again exactly as it was to start with.


There's a cut out along one edge of this adjuster (and the large disc) which locks it in position against the tab you can see touching the top of the large disc. As long as I ended up with the same 5 threads visible when it was locked I knew I was back where I started. To get the cable out you must spin the adjuster so it goes tight into the handlebar bracket (moves to the right in this pic) and with the slot down one side facing forward lining up with the one in the bracket. By then wiggling the rigid cable sheath it pops out of the adjuster and the cable itself then can be fed out of the slot in the front. The small cylinder that locks it in the clutch lever then drops straight down and you have one free cable.

Next is the attachement of the magic cable luber which looks like this.


The inner cable feeds through the centre of the rubber bung and the bottom of the rigid sheath goes into the bottom of this. The clamp is then closed which seals against the bottom of the sheath allowing the top of the cable to poke out (you can see the cylinder on the end which locks it in the clutch cable). A can of WD40 squirted into the hole in the side then can't go out the top and must go down the gap between the clutch cable and sheath lubricating it. A couple of squirts, a couple of pulls on the cable to let the lube go down, and it all felt much looser.

After wiping everything up (lube near tires... not a good idea) I fired the bike up again and went out for a quick spin.

The clutch felt much smoother than it was to start with so it looks like the WD40 has done the trick. It also appears the bike can knock on the door of 80mph in 2nd ...... which is nice for overtaking coming off roundabouts as I found out on the way back :-)

Wednesday 25 March 2009

GPS... mark II

The handlebar mount, after being lost by the postie for 2 weeks, finally turned up today to allow me to mount the Garmin Nuvi on my handlebars.


In this position it doesn't appear to be blocking my field of view of the speedo so I just need to take it for a test drive to make sure it looks OK and we're sorted.

I also took the extra safe option of securing it with a quick release strap to the handlebars in case the mount comes loose.


The Nuvi itself has a pad of velcro securing it tightly to the holder, then a cable tie provides me with a loop to hold on to the cradle. The quick release strap, after I trim it down to make it neater, holds this to the handlebar so if the mount goes, or the ball joint that the Nuvi holder clicks onto goes, I should still have it dangling an inch below the bars rather than bouncing off down the motorway.

Grand total of £4 for the mount, £2 for the quick release and velcro, leaving me with £394 saved from the price of a Garmin Zumo that would do the same thing.

So really I could buy that GoPro Hero wide camera and I'd still have saved money ;-)

Wednesday 18 March 2009

Show me the way to go home

This week I have mostly been experimenting with GPS related solutions for my bike. There are three main approaches to take with this.
  1. Buy a Garmin Zumo 550. This is designed to work on a motorbike, is waterproof, has bluetooth so you can hear directions in your helmet, and is perfect for the job. It also costs £400, so we'll put that on the "maybe" pile.
  2. Use the Nokia N95 which comes with Nokia maps already installed. The phone isn't waterproof so it needs to go inside my tank bag. With some velcro strips to stop it sliding around I fashioned the holder (free with screen protectors) and a velcro pad inside the bag.
This is the holder with velcro on the back.


And in situ with the phone inside the tank bag.


I used this on the way to work and back on the bike this week and found the following slight downsides to this as a solution.
  • It costs £6 per 30 days (or £60 a year) in subscriptions for nokia maps to do routing and voice navigation for you. They do give a free 7 day trial which is what I used for this test.
  • You can't see the screen very well (if at all) and can only hear directions at low speed.
  • It is convinced you are riding off the road despite being on it, so won't give you directions thus defeating the whole idea of using it as a Sat Nav.
So I think this is consigned to the emergency "where the heck am I" role when I'm lost on the bike as GPS positioning is free and does work. It's also handy when used with the other Nokia freebie, Sportstracker, which will create a gps log of a route for you so you can tell where you bimbled.

  1. Garmin Nuvi. I already have this so the cost is nothing. I already have the velcro strips off eBay to attach it to the inside of the tank bag (£2).


On the test ride to work and back, this had the distinct advantage that
  • It knew I was on the road
  • Routed correctly
  • Was audible coming up to roundabouts and the like where you need it
  • Doesn't cost anything in subscriptions.
  • You can see the screen (if you tilt it slightly back with a carrier bag under the far edge, proper solution to follow)
So the clear winner is the Nuvi. The price is right, and it works :-)

Brum Brum.

Thursday 5 March 2009

D'oh... a deer... a female deer.

Today happened to be a days holiday and as the snow forecast by those chaps at the met office never materialised it was a shame to leave the bike in the garage so arranged to meet up with Frank (the elder) down in sunny Saffron. Before leaving I checked the outside temperature with my latest eBay purchase (infrared thermometer with laser pointer because... well... Dave has one), and it was a rather brisk 0.6C in the back garden. Ouch!!!!

A quick change into thicker socks (and an additional thermal layer in the tank bag just in case the two jumpers and bike jacket weren't enough) and I was off. Once on the M11 and "making progress" it was getting a bit chilly but as it was only a 20 min trip from there I held on and defrosted my hands courtesy of a cuppa from Missus Frank ;-)

Once Frank had his mittens on, had wiped his nose, and promised to do his homework when he got back, the boys were allowed out to play, Frank in the lead, and me playing catchup.

The roads were pretty twisty, and covered in mud, grit, stones, misc crap (thank you Mr Tractor) so there was no knee down action (and if there was it would be followed by shoulder and head down action I reckon) but I had fun accelerating up the straight bits and plenty of gear changing action (although it seems the Fz6 will do anything from 10-70mph staying in 2nd, which is nice). The 10 miles up to Balsham saw us ready for a pub lunch and a sit in front of the fire to defrost again, so we did courtesy of Mike in "The Bell".

Coming back we dropped onto the A11 where the bike again doesn't appear to need all its gears before coming back through the villages again heading for home.

Not 1 mile from my front door, a Muntjac Deer decided to run across the road right in front of me and I had visions of the chicken episode all over again, but on a much larger, and more painful scale. Luckily I slowed enough to let it sneak in front of my front tire and across the road and Frank was far enough back to not run into the back of me. Fresh underpants were donned at home, and a cuppa made things all right in the world once more.

Roll on spring when the weather warms up a bit and we can get out for more bimbles in the countryside.

Saturday 28 February 2009

Ally Pally. Home of the BBC and bike shows

The return of the Ally Pally bike show and Paul, Frank and I headed down there with two wheels each as the weather was cool but not cool enough to wuss out and take the car.

Due to rather poor navigational skills on my part, I took the wrong exit at a roundabout on the A10 so had to play catch up with them for a few miles, which is surprisingly easy on a FZ6. On a nice straight bit of road where you could see for miles, and there were no other cars (but their bikes in the distance) I opened it up and the speedo tripped over into 3 digits for the first time ever. :-)

I then realised I wasn't in top gear so changed up. Twice!!!! Chuff me, it does a ton in 4th and still has two gears languishing in the comfy chairs smoking pipes and drinking Port.

We made good time all the way down to London until the google map directions suggested we turn down a one way street, so we passed on that and made our own way up to the house on the hill. Cracking views over London from up there and you can easily see Canary Wharf and the Gherkin.

Coffee (and a Danish Pastry for the fat git.... guilty as charged) saw us refreshed and ready for a wander round the halls. The stands were much more spread out than the Excel show earlier this year and there were far more stalls selling tools and bits n bobs (rather than whole bikes which my wallet doesn't stretch to). A break for lunch in the on site pub refreshed us and we went off for round 2 picking up some bits n bobs.

The ride home was more eventful in that there was a traffic jam for what seemed like several miles trying to get onto the North Circular. Paul and I (novices that we are) followed Frank (the elder) in filtering past all the traffic. I used my standard assumption that cars will suddenly turn right across your path randomly here, which they did, so made sure I could "make progress" quickly past each car so I was never in their blind spot. We saved loads of time doing this as the cars were pretty much stationary.

The route out of London saw us all split up due to random traffic lights catching us out and Frank and Paul headed off into the distance. Eventually, just before home, I looked in my wing mirrors, and did a double take as Paul appeared in them. They had stopped at a garage thinking I was mile behind, and apparently I whizzed by pretty much straight away.

All home safely, cups of tea, and possibly a biscuit or two, are the order of the day.

100 miles down. Many more to go this summer hopefully :)

Brum Brum.

Wednesday 25 February 2009

But now I'm dribbling

Tuesday I decided to get the bike out and start riding it into work to get some more miles under my belt. The round trip is 25 miles so I can easily get 100 miles a week in even if I wuss out when the weather turns.

The ride is a few twisties out of the village, a bit of a blast down the straight road into Cambridge where I can have a bit of a grin with the acceleration of the bike, and a bit of sitting in traffic at the far end (which when I get more confident about filtering I'll be able to breeze past).

The ride went fine but when I parked the bike in the garage that night, I went out an hour later to find this.


That blue coloured puddle is scottoil :(


And that slight blue tinge? You guessed it :(

It transpired that the exceedingly small under seat storage area meant that my disc lock slid forward and just slightly dislodged the joint where the lube tube attaches to the scottoiler resulting in half a tube of the stuff running out, down the frame, along the swing arm, and forming a couple of puddles. Bah humbug.

Mopping everything up it didn't leak overnight, nor again all today in the car park at work, so I'm hoping it was just teething troubles.

On a more positive note I'm managing to "make progress" better each day ...... Officer ;-)

Saturday 21 February 2009

Two wheels.. I won't be needing one of those says Dave

Feb 21st... a momentous day in that the bike came out of the garage for the first time since it was put into hibernation for the winter. And oh what fun we had :)

This was the first ride out since all the modifications had been made to the bike so was my first chance to see what difference braided hoses, pazzo levers etc made to the ride. To start with we did a quick 5 miles to check the scottoilers were adjusted correctly, which, when pulled over in a lay by, we discovered they weren't. Back to base to fettle the FZ6 and Dave's bandit, and off we went again for a 30 mile ride and back again.

This time Dave's rather thirsty bandit needed fueling and at this point we noticed that there was a small pool of scottoil on the floor under his bike, up the frame, and smoking merrily off the exhaust pipe. Back to base for more cups of tea, and checking for leaks the problem looked to be sorted so off we headed for more jollity on 2 wheels on a 20 mile circuit.

Dave took my FZ6 for a spin as I wasn't sure if my tyres were up to scratch (first big bike and all, and they are 5 years old). His grin on returning suggested that actually the tires were fine, and the bike likes to use only one wheel if you try to "make progress" too vigorously :)

Back at base once more, Dave's scottoiler was peeing oil still so looks to be faulty. So we had another brew to celebrate its demise cooked up on the unleaded stove in the garden.... because... well.... it involved lighting fires :p

As for the mods:-
Pazzo levers. Gear changes are much smoother now than using the stock Yamaha ones. And they look smashing!
Braided hoses. Braking into roundabouts is much more positive and you don't appear to need to apply much pressure at all. Vast improvement!
Scottoiler. One working well. Once MIA.

May this be the first of many days out on the bike now the weather has turned.

Sunday 15 February 2009

Give me a lever, oil me up, and I'm happy

The Pazzo levers arrived this week shipped over from the good old US of A. I couldn't find a company in the UK that did the lever colour I wanted (dark blue), but Tim of Pashnit took my order on the Sunday for my own choice of lever and adjuster, shipped them out to be made and engraved (yes engraved) on the Monday and they arrived in my greasy little mitts the following Monday. And they're cheaper than in the UK :)

The stock (boring) ones looked like this.


The new improved ones look like this.
Brake:-


Clutch:-


You can see the clutch is engraved with my blogsite :-)

Total time for fitting these is about 10 mins as each one just has a single bolt dropped through them. The only tricky bit is making sure you press the switches on the clutch and brake back in as you offer up the levers and they slip straight in.

Next on the list was the fitting of Scottoilers to my Fazer and do-it-daves Bandit. Removing the seat and fairing shows how much space is available on an FZ6 (none) and a Bandit (enough for sandwiches, flask of coffee, and a trestle table to sit down at).

Fazer:-


Daves Bandit:-


After some smurfing the interweb on the FZ6 forum I found someone had fitted one in such a way that it doesn't take up half of the under seat area by sliding it forward into a small Scottoiler sized space. Like this...


You can just make it out in the gap between the fairing and the frame with the pipe leading down on its way to the back wheel.


And here it is again looking from the back of the bike so you can see where it gets slid into place. The lube tube gives and extra reservoir of 3000 miles or so, so means you can go touring and now worry about oiling the chain :) This is flexible so is coiled around the outer edge of the seat area leaving room in the middle for the toolkit and disc lock.

This shows the routing of the tube itself coming from the reservoir, down through a small piece of rigid tube cable tied to the plate behind the clutch pedal where it transitions into the narrow tube that feeds the applicator itself. The smaller tube is cable tied to the bottom of the swing arm (there are silver cable-ties in the kit along with numerous other bits you may or may not need depending on your bike).


Finally, the dual applicator itself which drips oil onto both edges of the chain.


Oh, and the other part which drives the whole thing is a vacuum feed. The Scottoiler website suggests cutting into a pipe and inserting a t-piece for this. However I found another set of instructions that suggest just removing the bung in the end of one of the vacuum tubes and sticking it up there, so I did. Like this (circled in yellow so you can see which pipe I mean).


This took several hours where much tea was consumed, many fairings were removed, stared at, put back in place again. A great deal of chin scratching was also called for trying to work out the best way on both bikes to route everything so it looks neat as there are almost an infinite number of ways to do this. Your friend here is the box of sacrificial cable ties that you can use to fettle things into place, before cutting them off and trying something else.

On the plus side, this does mean I don't have to lube the chain up every time I get home as it will be lubed on route ... which is nice.

To round the day off Dave broke out his brand spanking new MSR stove that handily runs on unleaded and we had a cup of tea made with water boiled on it while we wondered how long it's going to take for our eyebrows to grow back. This can then go in Dave's under seat area (next to the trestle table) so we can have a brew on longer rides.

Not a bad Sundays work all on all, and that's now all the mods I can think of to do on the FZ6. Now for a summers riding... whoo hoooooo!!!!!!!

Saturday 7 February 2009

But I've still......got the blues..... for my bike

Demon-tweeks did the business and got the bits I ordered to me in time for a saturday afternoon in the garage with wooly hat and Planet Rock turned up to 11.

The brake lines have now been secured to the front forks with some anodised P-clips replacing the black one one one side, and nothing on the other.


This second one needed a 20 mile round trip to B&Q for some nylock nuts as the hole it attached to wasn't threaded, something I neglected to check in my haste to get the bike back together.


A hose separator brings the two lines together under the horn. It's not overly neat but the p-clips on each side are at different heights meaning the brakes lines don't come together symetrically. I've got another hose separator spare in case I work out a better way of doing this but it'll do for the moment.


The observant amongst you will notice that the horn bolt has also been replaced with a snazzy blue number. I had to remove the horn to get the lines routed and tied down, and the bolts come in packs of 5 so ... well .... pimp my ride baby!

Doing my bit for mother earth I recycled the old connector hole that the stock brake line came down through but of course used something with a bit more bling. Not obvious with the fairings all in place, but I know it's there and that's what counts :p


And last, but not least, I tidied up something that had been bugging me for ages. The power socket was just connected onto the battery, threaded through the fairing, and cable-tied to the handlebars on that little rectangular brackety thing (to give it it's technical name). For under two of your english pounds I picked up a couple of metres of braided polyester sleeving on eBay and threaded the wires through this, resoldering the ends neatly it now looks much better. Removing the inline fuse meant I could do all the soldering without worrying about shorting the battery out and more importantly removing the battery bolts which are complete bar-stewards to get back in.


Next week my Pazzo levers should arrive from America where somehow they are cheaper than the UK, shipping is free, and I get them engraved with the letters of my choice into the bargain. Sweet!!!

Sunday 1 February 2009

Taxing times

After a trip to the MCN bike show yesterday my cunning plan to put the bike back together today fell at the first hurdle when all the bits I needed weren't actually at the show so I had to order them from demon-tweeks website when I got home.

Luckily I managed to pick up one bit of bling for the bike that I could fit today which should improve the performance of the bike no end. A blue anodised tax disc holder ;-)

The original one is
  • Very plain
  • Very easy for someone to pinch the tax disc out of as only a rubber gasket stands between the disc and freedom.


The new one has a blue anodised faceplate, a carbon fibre look-a-like backplate, and allen key headed screws with nylock nuts on the back which should prevent the casual tea-leaf from getting the tax disc out.


The small flaw in the plan currently is that the whole thing is attached to the bike with a standard phillips head screw but I'm sure I can find something an Allen headed version to replace it with.

Next weekend hopefully the rest of the bits should turn up so I can get the bike back on the road.

The other purchase at the show was a scottoiler (Dave and I picked up a brace of them as the price was too good to pass up). This will be slotted in another weekend and then the bike is almost done, apart from the Pazzo's which I'm ordering this afternoon :)